Search This Blog

Monday, August 5, 2019

Code Coverage Tutorial: Branch, Statement, Decision, FSM

What is Code coverage?

Code coverage is a measure which describes the degree of which the source code of the program has been tested. It is one form of white box testing which finds the areas of the program not exercised by a set of test cases. It also creates some test cases to increase coverage and determining a quantitative measure of code coverage.
In most cases, code coverage system gathers information about the running program. It also combines that with source code information to generate a report about the test suite's code coverage.

Why use Code Coverage?

Here, are some prime reasons for using code coverage:
  • It helps you to measure the efficiency of test implementation
  • It offers a quantitative measurement.
  • It defines the degree to which the source code has been tested.

Code Coverage Methods

Following are major code coverage methods
  • Statement Coverage
  • Condition Coverage
  • Branch Coverage
  • Toggle Coverage
  • FSM Coverage

Statement Coverage

What is Statement Coverage?
Statement coverage is a white box test design technique which involves execution of all the executable statements in the source code at least once. It is used to calculate and measure the number of statements in the source code which can be executed given the requirements.
Statement coverage is used to derive scenario based upon the structure of the code under test.
In White Box Testing, the tester is concentrating on how the software works. In other words, the tester will be concentrating on the internal working of source code concerning control flow graphs or flow charts.
Generally in any software, if we look at the source code, there will be a wide variety of elements like operators, functions, looping, exceptional handlers, etc. Based on the input to the program, some of the code statements may not be executed. The goal of Statement coverage is to cover all the possible path's, line, and statement in the code.
Let's understand this with an example, how to calculate statement coverage.
Scenario to calculate Statement Coverage for given source code. Here we are taking two different scenarios to check the percentage of statement coverage for each scenario.
Source Code:

Scenario 1:
If A = 3, B = 9
The statements marked in yellow color are those which are executed as per the scenario
Number of executed statements = 5, Total number of statements = 7
Statement Coverage: 5/7 = 71%
Likewise we will see scenario 2,
Scenario 2:
If A = -3, B = -9
The statements marked in yellow color are those which are executed as per the scenario.
Number of executed statements = 6
Total number of statements = 7
Statement Coverage: 6/7 = 85%
But overall if you see, all the statements are being covered by 2nd scenario's considered. So we can conclude that overall statement coverage is 100%.
What is covered by Statement Coverage?
  1. Unused Statements
  2. Dead Code
  3. Unused Branches

Decision Coverage

Decision coverage reports the true or false outcomes of each Boolean expression. In this coverage, expressions can sometimes get complicated. Therefore, it is very hard to achieve 100% coverage.
That's why there are many different methods of reporting this metric. All these methods focus on covering the most important combinations. It is very much similar to decision coverage, but it offers better sensitivity to control flow.

Example of decision coverage

Consider the following code-

Scenario 1:
Value of a is 2
The code highlighted in yellow will be executed. Here the "No" outcome of the decision If (a>5) is checked.
Decision Coverage = 50%
Scenario 2:
Value of a is 6
The code highlighted in yellow will be executed. Here the "Yes" outcome of the decision If (a>5) is checked.
Decision Coverage = 50%
Test CaseValue of AOutputDecision Coverage
12250%
261850%

Branch Coverage

In the branch coverage, every outcome from a code module is tested. For example, if the outcomes are binary, you need to test both True and False outcomes.
It helps you to ensure that every possible branch from each decision condition is executed at least a single time.
By using Branch coverage method, you can also measure the fraction of independent code segments. It also helps you to find out which is sections of code don't have any branches.
The formula to calculate Branch Coverage:

Example of Branch Coverage

To learn branch coverage, let's consider the same example used earlier
Consider the following code

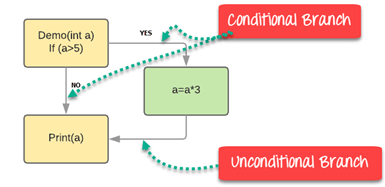
Branch Coverage will consider unconditional branch as well
Test CaseValue of AOutputDecision CoverageBranch Coverage
12250%33%
261850%67%
Advantages of Branch coverage:
Branch coverage Testing offers the following advantages:
  • Allows you to validate-all the branches in the code
  • Helps you to ensure that no branched lead to any abnormality of the program's operation
  • Branch coverage method removes issues which happen because of statement coverage testing
  • Allows you to find those areas which are not tested by other testing methods
  • It allows you to find a quantitative measure of code coverage
  • Branch coverage ignores branches inside the Boolean expressions

Condition Coverage

Conditional coverage or expression coverage will reveal how the variables or subexpressions in the conditional statement are evaluated. In this coverage expressions with logical operands are only considered.
For example, if an expression has Boolean operations like AND, OR, XOR, which indicated total possibilities.
Conditional coverage offers better sensitivity to the control flow than decision coverage. Condition coverage does not give a guarantee about full decision coverage
The formula to calculate Condition Coverage:
Example:
For the above expression, we have 4 possible combinations
  • TT
  • FF
  • TF
  • FT
Consider the following input
X=3
Y=4
(x
TRUE
Condition Coverage is ¼ = 25%
A=3
B=4
(a>b)
FALSE

Finite State Machine Coverage

Finite state machine coverage is certainly the most complex type of code coverage method. This is because it works on the behavior of the design. In this coverage method, you need to look for how many time-specific states are visited, transited. It also checks how many sequences are included in a finite state machine.

Which Type of Code Coverage to Choose

This is certainly the most difficult answer to give. In order to select a coverage method, the tester needs to check that the
  • code under test has single or multiple undiscovered defects
  • cost of the potential penalty
  • cost of lost reputation
  • cost of lost sale, etc.
The higher the probability that defects will cause costly production failures, the more severe the level of coverage you need to choose.

Code Coverage vs. Functional Coverage

Code CoverageFunctional Coverage
Code coverage tells you how well the source code has been exercised by your test bench.Functional coverage measures how well the functionality of the design has been covered by your test bench.
Never use a design specificationUse design specification
Done by developersDone by Testers

Code Coverage Tools

Here, is a list of Important code coverage Tools:
Tool NameDescription
CocoIt is an Cross-platform and cross-compiler code coverage analysis for C, C++, SystemC, C#, Tcl and QML code. Automated measurement of test coverage of statements, branches and conditions. No changes to the application are necessary Learn more about coco
Parasoft JtestIt accelerates Java software development by providing a set of tools to maximize quality and minimize business risks. Results from static analysis, JUnit tests, and code coverage are efficiently integrated with functional and manual testing results. Learn more about Parasoft Jtest
CoberturaIt is an open source code coverage tool. It measures test coverage by instrumenting a code base and analyze which lines of code are executing and which are not executed when the test suite runs.
CloverClover also reduces testng time by only running the tests which cover the application code which was modified since the previous build.
DevPartnerDevPartner enables developers to analyze Java code for Code Quality and Complexity.
EmmaEMMA supports class, method, line, and base block coverage, aggregated source file, class, and method levels.
JTestJT's tool helps you to check functionalities like unit test-case generation, static analysis, regression testing, and code review.
KalistickKalistick is a third party application which analyzes the codes with different perspectives.
CoView and CoAntCoding Software is a code coverage tool for metrics, mock object creation, code testability, path & branch coverage, etc.
Bullseye for C++BulseyeCoverage is a code coverage tool for C++and C.
SonarSonar is an open code coverage tool which helps you to manage code quality.

Advantages of Using Code Coverage

  • Helpful to evaluate a quantitative measure of code coverage
  • It allows you to create extra test cases to increase coverage
  • It allows you to find the areas of a program which is not exercised by a set of test cases

Disadvantages of Using Code Coverage

  • Even when any specific feature is not implemented in design, code coverage still report 100% coverage.
  • It is not possible to determine whether we tested all possible values of a feature with the help of code coverage
  • Code coverage is also not telling how much and how well you have covered your logic
  • In the case when the specified function hasn't implemented, or a not included from the specification, then structure-based techniques cannot find that issue.

Summary

  • Code coverage is a measure which describes the degree of which the source code of the program has been tested
  • It helps you to measure the efficiency of test implementation
  • Five Code Coverage methods are 1.) Statement Coverage 2.) Condition Coverage 3) Branch Coverage 4) Toggle Coverage 5) FSM Coverage
  • Statement coverage involves execution of all the executable statements in the source code at least once
  • Decision coverage reports the true or false outcomes of each Boolean expression
  • In the branch coverage, every outcome from a code module is tested
  • Conditional will reveal how the variables or subexpressions in the conditional statement are evaluated
  • Finite state machine coverage is certainly the most complex type of code coverage method
  • In order to select a coverage method, the tester needs to check the cost of the potential penalty, lost reputation, lost sale, etc.
  • Code coverage tells you how well the source code has been exercised by your test bench while Functional coverage measures how well the functionality of the design has been covered
  • Cobertura, JTest, Clover, Emma, Kalistick are few important code coverage tools
  • Code Coverage allows you to create extra test cases to increase coverage
  • Code Coverage does not help you to determine whether we tested all possible values of a feature

Friday, August 2, 2019

50 things S/W test automation engg should know

Scripting
  • Do Not Use Record & Play in Real Projects
  • Do Not Use Pauses
  • Provide Exit by Timeout for Loops
  • Do Not Consider Test Automation as Full-Fledged Development
  • Do Not Write Bulky Code
  • Verify All Options of Logical Conditions
  • Use Coding Standards
  • Use Static Code Analyzers
  • Add an Element of Randomness to Scripts
  • Do Not Perform Blind Clicks Against Nonstandard Controls
  • Learn and Use Standard Libraries
  • Avoid Copy and Paste
  • Do Not Use try…catch with an Empty catch Block
  • Separate Code from Data
  • Learn How to Debug
  • Do Not Write Code for the Future
  • Leave the Code Better Than It Was
  • Choose a Proper Language for GUI Tests
  • Remember to Declare and Initialize Variables

Testing
  • Do Not Duplicate Tested Application Functionality in the Scripts
  • Each Test Should Be Independent
  • What Should Not Be Automated?
  • Ask the Developers for Help
  • Cloud Testing
  • Introduce Automation for Corner Cases
  • The Difference Between Error and Warning
  • Use the Appropriate Methodologies
  • Verification of Individual Bugs
  • Make a Pilot Project Before Writing Real Tests

Environment
  • Choose a Proper Set of Tools for Your Needs
  • Do Not Automatically Register Bugs from Scripts
  • Do Not Chase After a “Green Build” in the Prejudice of Quality
  • Learn the Tool You Work With
  • Make Use of Version Control Systems
  • Avoid Custom Forms
  • Simplify Everything You Can
  • Automate Any Routine

Running,Logging,Verifying
  • Run Scripts as Often as Possible
  • Perform an Automatic Restart of Failed Tests
  • A Disabled Test Should Be Provided with a Comment
  • Errors in Logs Should Be Informative
  • Make a Screenshot in Case of Error
  • Check the Accuracy of Tests Before Adding Them to the Regular Run
  • Avoid Comparing Images

Reviewing
  • Write Tests That Even Non-Automation Engineers Can Understand
  • Avoid Unneeded Optimization
  • Review Someone Else’s Code Regularly
  • Participate in Forums and Discussions
  • Perform Refactoring
  • Remove Tests That Provide Minimal Benefit

Why Selenium and Cucumber Should Not Be Used Together

In this post, I will explain why I believe it is a bad idea to write UI automated tests with Selenium and Cucumber.
The title of the post mentions Selenium and Cucumber because they are the most popular browser automation and BDD tools respectively, however, the context of this article applies to any UI automation tool in combination with any BDD tool.
Before I dig deeper, let’s review some background information.

What is Selenium?

Selenium is a browser automation testing tool which is capable of interacting with the HTML elements of a web application to simulate user activity.
In Selenium WebDriver, we can write scripts in a number of programming languages and can be a great asset for multiple OS and cross-browser testing.

What is Cucumber?

Cucumber was created to drive Behaviour Driven Development (BDD) process, such that the customer can describe their requirements as a series of examples called scenarios, in plain text files using the Gherkin language in the Given When Then format.
In Cucumber world, these files are called feature files which are reviewed by the Scrum team to get a clear understanding of the requirements before starting the actual development.
Once development is underway, the developers and/or QA will write Step Definitions which are essentially snippets of code which bind the scenarios from the feature files to the test code which execute actions against the application under test.

Selenium and Cucumber

Both Selenium and Cucumber are great tools for their own purposes but when used together, things don’t marry up nicely! Let’s see why.
Stories are generally written from a user’s perspective, for example:
Feature: Login functionality
As a user of website abc.com
I want customers to be able to login to the site
So that they can view their account information.
In turn, Scenarios in the feature files are written in a way which describes the behavior of the feature when a user interacts with the application. For example:
Scenario 1: Valid login
Given I am on abc.com Login page
When I enter valid credentials
Then I am redirected to My Account page
And so you can add more scenarios to test different data combinations.
Because both the story and the feature file are written from a high-level point of view, and because we want to automate the scenarios, it only seems natural to start writing step definitions in Cucumber which call Selenium to drive the application, do the actions and verify the outcome.
But, this is where the problem occurs; when we start combining Selenium with Cucumber to write automated UI tests.
In all fairness, in simple cases like the Login scenario above, things fit nicely together and the approach seems plausible, and in fact, most examples that you see on the internet, demonstrating the use of Selenium and Cucumber, seem to limit themselves to the famous Login example.
The readers of such blogs would assume that they can take the simple Login scenario and apply the same principle to a wider context of an application.
Don’t be fooled though, as things can get very sour with Selenium and Cucumber when applied to a real-world large web-based application.
Let’s take an example of a search results page of a typical e-commerce application which sells products online. Normally the search results page is full of features, such as filters, sorts, list of products, ability to change search, ability to paginate or auto-load on scrolling, etc, as can be seen in the screenshot below:
selenium-cucumber-example
I’m going to assume that each feature on the search results page, was added to the site on an incremental basis using agile development.
Applying the same principle of our simple Login example, as each feature is developed we would have a respective feature file filled with lots of different scenarios. For example:
In iteration 1 of the development, “Filter by Price” is developed, so we would have a feature file for it with its own scenarios related to the price filter.
In iteration 2 of the development, “Filter by Star Rating” is developed, so we would have a feature file for it with its own scenarios related to the star rating filter, and so on for each new feature.
It is important to note that the scenarios in each feature file are only specific to their respective feature. In fact, this is why they are called feature files because the focus is on individual features.
As mentioned earlier, when the application is simple, we can survive the challenge of automating the scenarios on UI with Selenium and Cucumber. However, as the application grows and new features are added, complexity arises as there could be dependencies between different features.
For instance, I could first filter my search results by price then apply another filter for the star rating. Ah…we now have a problem!
Which feature file should this scenario now go? In “Filter by Star Rating” file or “Filter by Price” file? How about if I now add a scenario to apply a sort to my filtered results to sort by highest votes?
If a stakeholder wishes to see what our test coverage is, which of the feature files should he look into? Will he get the full picture of scenario coverage by reading just one of the feature files or would he need to read all feature files?
At the time of development, when each feature is developed one by one in each iteration, the feature files would be focused on the feature itself, so at some point, when we have multiple features, we need to start thinking about testing these, not only in isolation but also creative scenarios where we combine different features.
And in fact, this is what real users of the application will do. They will first enter their search criteria, once on the search results page, they would possibly paginate, then filter, then sort, then go back, and so on, and they can do these actions in any order. There won’t be a prescribed order of events. This is a real user journey and a real test of the system!
Majority of the bugs in an application are exposed when either a feature itself is buggy or when two features that work perfectly well in isolation, don’t work together. This is what the Pairwise Testing Model is based upon.

So, what’s the big deal with using Selenium and Cucumber together?

Where at all possible, we should not use the web GUI for functional verification. The functionality of a feature should be tested at the API layer by integration tests.
UI should only be reserved for checking the user flows through the application, or end-to-end tests and making sure relevant expected modules or widgets are present on the page as the user navigates from one page to another.
A typical user journey would entail:
1 – Navigate to the homepage of abc.com website
2 – Search for a product from the homepage
3 – Browse through the list of search results
4 – Apply filter and/or sort
5 – Read product details
6 – Add the product to basket
7 – Continue to check out…
Selenium is excellent in automating these scenarios and checking for various elements on each page and as I mentioned above, that’s what we should focus on when testing at UI layer, and testing the different states transition.
As can be seen, each user journey through the application touches on many pages and potentially interacts with multiple features on each and every page, and we would be verifying various things at each step throughout the journey, so using a “feature file” to document these scenarios makes absolute no sense whatsoever, because we’re not testing a feature, we’re testing the integrated system.
Things really go pear-shaped when we attempt to write the end-to-end scenarios in a Given-When-Then format. How many Givens are we going to have? How many Thens are we going to have?
One could argue that for end-to-end tests we could just use Selenium on its own without the Cucumber and have separate automated tests for each feature using Selenium and Cucumber. Again, I don’t recommend this approach as you will possibly have duplicate tests and we know how slow and brittle UI tests are, so we should aim to have less of them not more! Moreover, you will still have to deal with feature dependencies tests.
To summarise:
Cucumber is a great tool in checking the behavior of a feature at the API layer with integration tests where each feature can be thoroughly tested. This tool should be used for Story Testing.
Selenium is a great tool for automating user scenarios at the UI layer and checking the behavior of the system as a whole. This tool should be used for User Journey Transitionencompassing many user stories.
When we get to System Integration Testing or UI Testing, it is best to use Selenium without the underlying Cucumber framework as trying to write Cucumber feature files for user journeys, can get very cumbersome and would not serve the purpose the tool is built for.
My article is based on deducing facts!
  • If there is any value in using cucumber, it is at the feature level.
  • Checking functionality of a feature is best done outside of UI, e.g. API tests.
  • Even at API layer tests, cucumber fails miserably.
  • UI Tests should cover user/business scenarios and not single features.
Cucumber works beautifully with a simplistic and naive view of tests and scenarios, such as everyone’s favorite login functionality.
Given I am on the login page
When I enter valid credentials
Then I should see my account
But any savvy tester knows that even a simple login functionality has many many checks. Try converting those checks in cucumber.
This is just for login; try writing an end-to-end test in cucumber!
UI tests should be covering user journeys which are typically end-to-end and exercise multiple features of an application.
There is a lot that goes on in a single user journey across the application.
Cucumber is definitely NOT the right tool for user/business scenario testing.

My Profile

My photo
can be reached at 09916017317