Search This Blog

Showing posts with label Framework development. Show all posts

Tuesday, May 17, 2022

Distributed Caching - Key Features

Caching in distributed systems is an important aspect for designing scalable systems. We first discuss what is a cache and why we use it. We then talk about what are the key features of a cache in a distributed system.

The cache management policies of LRU and Sliding Window are mentioned here. For high performance, the cache eviction policy must be chosen carefully. To keep data consistent and memory footprint low, we must choose a write through or write back consistency policy.


Cache management is important because of its relation to cache hit ratios and performance. We talk about various scenarios in a distributed environment.


Use-cases of Cache

  • Save network calls
  • Avoid recomputations
  • Reduce db load
Store everything in cache?
  • As we know response times are much faster for response time to fetch details from cache insetad of db so does that mean we can store lot of data in cache?
    • Well you can't do for mutiple reasons
      • Firstly hardware on which cache runs is usually much more expensive than that of a normal database.
      • Secondly if you store ton of data in cache then search time will increase and as seacrh time keeps on increasing, it makes lesser sense to use the cache.
When to load and evict data from cache?
  • It's entirely depends on our cache policy we use.
    • First popular policy called as LRU (Least Recent Used).
      • kick out bottom most entries.
        • As an example if celebrity made a post/comment, ppl would want to load that and slowly it would be least used one
    • There is one more LFU (Least Frequently Used) but it's not frequently used in real world mostly :)
What problems poor eviction policy can cause?
  • Imaging you are asking for something from cache and it says I don't have it most of the time and you again going to ask DB so you are making more network calls.
    • So the first problem is Extra Calls.
  • Second problem when you have very small cache and imaging making entry for X and then making entry for Y and deleting for X.
    • This concept is called Thrashing.
  • Data Consistency
    • As an example server2 makes an update call and update the DB and now if server1 asks for X profile but it will fetch outdated profile. (would be even severe in terms of passwords updattion etc)


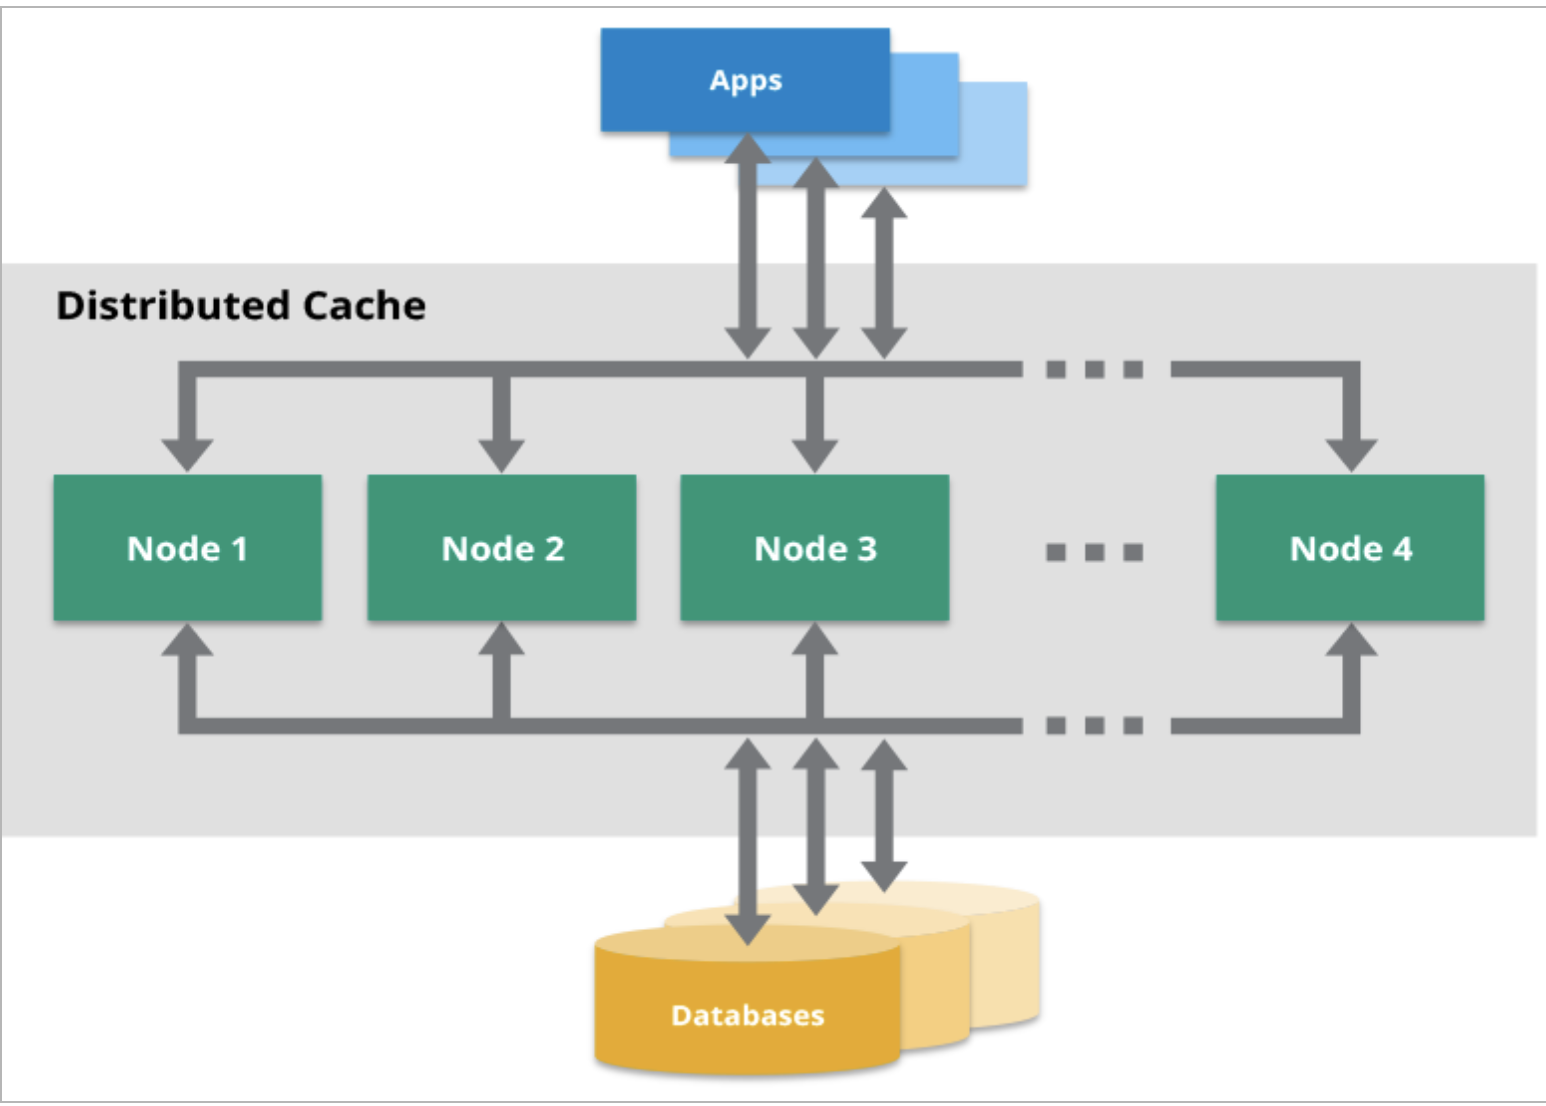
Where cache can be placed?
  • It can be placed closed to the database or can be placed close to the server.
    • There are benefits for both and drawbacks for both.
  • If you want to place close to the server, how close you can place, well you can place it in memory itself.
    • If you do this, amount of memory in your server is going to be used up by your cache.
      • If number of results is really small and you need to save on the network calls then you can just keep it in memory.
      • If let's say server2 fails, it's in-memory cache also fails
      • What if data on S1 and data on S2 are not consistent that means they are not in sync.
  • Putting cache near to db is like global cache.
    • In this case even if S2 crashes, S1 will keep serving requests and there won't be any data inconsistency.
    • Although it will be slightly slower but it's more accurate.
    • You can also scale this independently and servers would be resilient too.

How to make sure data is consistent in cache?
  • There are two approaches to achieve it
    • Write-through
      • You will make update entry in the cache and update further to the database.
      • Possible problems when servers having in-memory cache and let's say S1 making an update call and updated cache bur data would be inconsistent in S2 cache.
    • Write-back
      • Once you hit the database, make sure you make an entry in the cache.
      • Possible problem in write-back is performance
  • Both approaches having advantages and disadvantages.
    • Hybrid sort of solution would be best based on the use-cases.

Happy Learning :) 

Thursday, October 17, 2019

Framework Evaluation & Selection

Framework Evaluation Criteria

  1. Support automation integration testing for UI (real/headless browser/device), API,  performance in cross platforms.

    • For the integration test, we don’t test the front-end or back-end individually. We need to verify the data with the integration between system, front-end & back-end. So the framework needs to be able to support all testing type and especially crossing browser, device & system.
  2. Support CI integration with parallel execution.

    • The testing framework needs to be able to integrate with our current CI/CD. Parallel execution will help reduce the build time, so we will be able to deploy quickly and have faster turnaround times for bugs and features.
  3. Supports the concept of executable documentation for BDD (behavior-driven development)& DDT (data-driven testing) in modularization, maintainable and understandable test suites.

    • BDD will help the test case & test suite easy to maintaining and understanding. It also helps communication between business and development is extremely focused as a result of common language.
    • One of the most important concepts for effective test automation is modularization, it will help to create a sequence of test case only one and reuse as often as required in test script without rewriting the test all the time.

BDD Testing Framework Selection


GaugeCucumber
LanguageMarkdownGherkin
IDE & plugin supportYesYes
Easy to integrate with CI/CDYesYes
Easy to use, quick to learnNoNo
Reusable, easy to maintainYesYes
Parallel executionBuilt-in3rd party plugin
Customize reportingYesYes
PriceOpen source & free Open source & free 

Winner - Gauge:

  • An open source lightweight cross-platform test automation tool with the ability to author test cases in the business language and have built-in parallel execution feature.
  • Support BDD (Behavior-Driven Development) & CI(Continuous Integration) & report customization.

API Testing Framework Selection


REST AssuredPostman
Support BDDYes3rd third party
Support DDTYesLimit
Easy to integrate with CI/CDYesYes
Easy to use, quick to learnNoYes
Reusable, easy to maintainYesNo
Customize reportingCan be used with any customized/open source reporting tool.No
PriceOpen source & free 8-21$ per user/month for professional collaboration  & advanced features
  

Winner - REST Assured:

  • An open source Java-based Domain-Specific Language (DSL) that allows writing powerful, readable, and maintainable automated tests for RESTful APIs. 
  • Support testing and validating REST services in BDD (Behavior-Driven Development) / Gherkin format.

API Performance Testing Framework  Selection


Apache JMeterLoadrunner
Support DDTYesYes
Easy to integrate with CI/CDYesYes
Easy to use, quick to learnYesNo
Cross-platformYesWindows, Linux
Reusable, easy to maintainYesNo
Customize reportingYesYes
PriceOpen source & free Free for first 50 virtual User

Winner - Apache JMeter : 

  • Open source performance test runner & management framework may be used to test performance both on static and dynamic resources.
  • Support load test functional behavior and measure performance. It can be used to simulate a heavy load on a server, group of servers, network or object to test its strength or to analyze overall performance under different load types.

Test Runner & Test Suite Management Framework Selection


TestNGJUnit
Support DDTYesYes
Easy to integrate with CI/CDYesYes
Easy to use, quick to learnNoNo
Reusable, easy to maintainYesYes
Parallel executionYesYes
PriceOpen source & free Open source & free 
Annotation supportYesLimit
Suite TestYesYes
Ignore TestYesYes
Exception TestYesYes
TimeoutYesYes
Parameterized TestYesYes
Dependency TestYesNo
Support executing before & after all tests in the suiteYesNo
Support executing  before & after a test runsYesNo
Support executing  before the first & last test method
is invoked that belongs to any of these groups is invoked
YesNo

Winner - TestNG :

  • Open source test runner framework which helps to run your tests in arbitrarily big thread pools with various policies available and flexible test configuration.
  • Support DDT(Data-driven testing) & Test suite management.

Build Tool & Dependency ManagementFramework Selection


Apache MavenGrandle
Easy to integrate with CI/CDYesYes
Easy to use, quick to learnYesNo
Build Script LanguageXMLGroovy
Reusable, easy to maintainYesYes
Dependency ManagementYesYes
Dependency ScopesBuilt-inCustom
IDE & plugin supportManyA little
PriceOpen source & free Open source & free 

Winner - Apache Maven 

  • The leading open source dependency management and build tool. It standardizes the software build process by articulating a project’s constitution.
  • Software project management and comprehension tool in the concept of a project object model (POM), Maven can manage a project's build, reporting, and documentation from a central piece of information.

Tuesday, June 30, 2015

Some interesting Java Facts

Creation of an Object:

Following steps are completed while creating a new object of any class :-
1. Bind Constructor parameters.
2. If explicit this(),call recursively and skip to step 5.
3. Call recursively the implicit and explicit super(...),except for their Object class
because it has no parent class.
4. Execute the explicit instance variable initializers. // it refers to initialisation of instance variables at the time of their declaration.
5.  Execute the body of the current constructor.

Exceptions

1.finally clause is always executed regardless of the fact that exception is caused or not.
2.only way that finally will not be executed is virtual machine shutdown or execution of "System.exit(0)" method.
3.If return statement is embedded inside the try block then finally clause executes before return.
4. Exception must be thrown in same line where its object is created because it contains line no. information.

Accessing Members of "super base" Class

Suppose class B extends class A and class C further extends class B.
Now Suppose we want to access the members of class A directly through C class.
This can be either accomplished by using super twice once in C and once in B.
Or other way is to use super in Class C and if members with same name are not
present in B then this super will directly refer to member in super base class A.
example of a such a program.

class A
{
 static
 {
  System.out.println("static initializer of A");
 }
 {
  System.out.println("initializer of A");
 }
 A()
 {
  System.out.println("Constructor class A");
 }
 A(int a)
 {
  System.out.println("Constructor class A parameter");
 }
 void hello()
 {
  System.out.println("Hello in c");
 }
 void quality()
 {
  System.out.println("Quality Method Class A");
 }
}
class B extends A
{
 static
 {
  System.out.println("static initializer of B");
 }
 {
  System.out.println("initializer of B");
 }
 B()
 {
  System.out.println("Constructor class B");
 }
 B(int b)
 {
  System.out.println("Constructor class B parameter");
 }
 void show()
 {
  System.out.println("I m in class B");
 }
}
class C extends B
{
 static
 {
  System.out.println("static initializer of C");
 }
 {
  System.out.println("initializer of C");
 }
 C()
 {
  System.out.println("Constructor class C");
 }
 C(int c)
 {
  //super.show();
  System.out.println("Constructor class C parameter");
 }
 void show()
 {
  System.out.println("I m in class C");
 }
 void quality()
 {
  super.quality();
  System.out.println("Quality Method Class C");
 }
}
public class inh
{
 public static void main(String ...args)
 {
  A a=new C(3);
  a.quality();
 }
}

Polymorphic Arguments in Polymorphism

Suppose a method in a class uses reference of some base class as its argument to perform certain calculations. Now it can also intake the object of child class as its argument because child is also a type of base class object. Bu important point is that this method can only access the members of parent class and not child specific features.

Referring members of a base class in Polymorphism

If we create reference of base class then we can access child class methods which are overridden but child class specific methods are not accessible as accomplished by following program:
class base
{
 base()
 {
  System.out.println("base class");
 }
 void show()
 {
  System.out.println("Show method base class");
 }
}
class child extends base
{
 child()
 {
  System.out.println("child class");
 }
 void show()
 {
  System.out.println("Show method child class");
 }
 void specific()
 {
  System.out.println("Specific Method of Child class not present in base");
 }
 public static void main(String args[])
 {
  base b=new child();
  b.specific();//illegal will not compile
  b.show();//child class method executes
 }
}

All TestNG annotations with attributes

@BeforeSuite


@AfterSuite


@BeforeTest

@AfterTest


@BeforeGroups


@AfterGroups


@BeforeClass

@AfterClass

@BeforeMethod
@AfterMethod
Configuration information for a TestNG class:

@BeforeSuite: The annotated method will be run before all tests in this suite have run.
@AfterSuite: The annotated method will be run after all tests in this suite have run.
@BeforeTest: The annotated method will be run before any test method belonging to the classes inside the tag is run.
@AfterTest: The annotated method will be run after all the test methods belonging to the classes inside the tag have run.
@BeforeGroups: The list of groups that this configuration method will run before. This method is guaranteed to run shortly before the first test method that belongs to any of these groups is invoked.
@AfterGroups: The list of groups that this configuration method will run after. This method is guaranteed to run shortly after the last test method that belongs to any of these groups is invoked.
@BeforeClass: The annotated method will be run before the first test method in the current class is invoked.
@AfterClass: The annotated method will be run after all the test methods in the current class have been run.
@BeforeMethod: The annotated method will be run before each test method.
@AfterMethod: The annotated method will be run after each test method.

alwaysRun
For before methods (beforeSuite, beforeTest, beforeTestClass and beforeTestMethod, but not beforeGroups): If set to true, this configuration method will be run regardless of what groups it belongs to.
For after methods (afterSuite, afterClass, ...): If set to true, this configuration method will be run even if one or more methods invoked previously failed or was skipped.

dependsOnGroups
The list of groups this method depends on.

dependsOnMethods
The list of methods this method depends on.

enabled
Whether methods on this class/method are enabled.

groups
The list of groups this class/method belongs to.

inheritGroups
If true, this method will belong to groups specified in the @Test annotation at the class level.

@DataProvider
Marks a method as supplying data for a test method. The annotated method must return an Object[][] where each Object[] can be assigned the parameter list of the test method. The @Test method that wants to receive data from this DataProvider needs to use a dataProvider name equals to the name of this annotation.

name
The name of this data provider. If it's not supplied, the name of this data provider will automatically be set to the name of the method.

parallel
If set to true, tests generated using this data provider are run in parallel. Default value is false.

@Factory
Marks a method as a factory that returns objects that will be used by TestNG as Test classes. The method must return Object[].

@Listeners
Defines listeners on a test class.

value
An array of classes that extend org.testng.ITestNGListener.

@Parameters
Describes how to pass parameters to a @Test method.

value
The list of variables used to fill the parameters of this method.

@Test
Marks a class or a method as part of the test.

alwaysRun
If set to true, this test method will always be run even if it depends on a method that failed.

dataProvider
The name of the data provider for this test method.

dataProviderClass
The class where to look for the data provider. If not specified, the data provider will be looked on the class of the current test method or one of its base classes. If this attribute is specified, the data provider method needs to be static on the specified class.

dependsOnGroups
The list of groups this method depends on.

dependsOnMethods
The list of methods this method depends on.

description
The description for this method.

enabled
Whether methods on this class/method are enabled.

expectedExceptions
The list of exceptions that a test method is expected to throw. If no exception or a different than one on this list is thrown, this test will be marked a failure.

groups
The list of groups this class/method belongs to.

invocationCount
The number of times this method should be invoked.

invocationTimeOut
The maximum number of milliseconds this test should take for the cumulated time of all the invocationcounts. This attribute will be ignored if invocationCount is not specified.

priority
The priority for this test method. Lower priorities will be scheduled first.

successPercentage
The percentage of success expected from this method

singleThreaded
If set to true, all the methods on this test class are guaranteed to run in the same thread, even if the tests are currently being run with parallel="methods". This attribute can only be used at the class level and it will be ignored if used at the method level. Note: this attribute used to be called sequential (now deprecated).

timeOut
The maximum number of milliseconds this test should take.

threadPoolSize
The size of the thread pool for this method. The method will be invoked from multiple threads as specified by invocationCount.
Note: this attribute is ignored if invocationCount is not specified

Thursday, June 25, 2015

Bitnami Jenkins Usage Steps

Jenkins, previously known as Hudson, is an open source continuous integration server. Built with Java, it provides over 400 plugins to support building and testing virtually any project. It supports SCM tools including CVS, Subversion, Git, Mercurial, Perforce and Clearcase, and can execute Apache Ant and Apache Maven based projects as well as arbitrary shell scripts and Windows batch commands. It also can monitor executions of remote tasks.
Please, take a look to the Quick Start Guide to know the basic use of this Stack.

How to start/stop the servers?

Graphical tool
The native installers include a graphical tool to manage the servers easily. You can find the "manager-windows.exe", "manager-osx" or "manager-linux" tool in your installation directory. Using this tool, you can Start, Stop or Restart the servers and check the log files. You can click on the icon to start it.
manager-servers.png

manager-osx.png


win_platform.png
On Windows: You can also start the Manager tool from shortcuts: Start -> Program Files -> Bitnami Stack -> Manager tool
Command line tool
If you prefer, you can use the "ctlscript.sh" utility from the command line. This script is in the installation directory.
linux_platform.png
On Virtual Machines and Cloud images:
$ sudo /opt/bitnami/ctlscript.sh start
A native installer on Linux:
$ cd ~/application-version
$ ./ctlscript.sh start
mac_platform.png

On OS X: You can start the Manager tool from the installation directory or you can use the "ctlscript.sh" utility from a Terminal.
host:~ user$ cd /Applications/application-version
host:~ user$ ./ctlscript.sh start

Where is JENKINS_HOME variable pointing to?

We define JENKINS_HOME in your installation directory in the apache-tomcat/conf/Catalina/localhost/jenkins.xml file. By default it is pointing to apps/jenkins/jenkins_home.
Notice that the installation directory is /opt/bitnami in the Bitnami virtual appliances and Bitnami Amazon Images.

How to start with Git and Jenkins?

Jenkins application is running as "tomcat" user so it is necessary to configure this user in case you want to access to a private repository. If you use a public repository is not necessary to configure the Tomcat user.
Configure Tomcat user to have access to the Git repository
Previous versions of Jenkins require to create the Tomcat user folder:
$ sudo mkdir /home/tomcat
$ sudo mkdir /home/tomcat/.ssh
Then copy the private key to access to the repository into the "/home/tomcat/.ssh" folder:
$ sudo cp /path/to/id_rsa /home/tomcat/.ssh
And change the permissions
$ sudo chown -R tomcat:tomcat /home/tomcat
It is also necessary to save the hostname of your repository into the "known_hosts" file:
$ sudo su tomcat -c "/opt/bitnami/git/bin/git ls-remote -h git@YOUR_REPOSITORY.git HEAD"
The authenticity of host 'ec2-xx-yy-zz.compute-1.amazonaws.com (xx.yy.zz)' can't be established. 
ECDSA key fingerprint is e5:xx:9d:yy:ff:89:55:47:aa:fd:b5:ee:0a:pp:6f:8d.
Are you sure you want to continue connecting (yes/no)? yes
Configure Git repository in Jenkins 
Before creating the first Job, it is necessary to configure the Git user and email that Jenkins will use to clone the repository. You can configure these options in "Manage Jenkins" -> "Configure System" -> "Git plugin" section
configuring-jenkins-git-2a.jpg
Then create a new Job in Jenkins and specify the Git repository.
create-job-jenkins-3.jpg
And run the Build. If everything was properly configured, Jenkins will checkout the code from the Git repository.

How to upgrade Jenkins?

If you want to upgrade Jenkins keeping your data, you just need to download the latest jenkins.war file, copy it in your apache-tomcat/webapps directory and restart Tomcat. It is recommended to create a backup of the previous jenkins.war file. You may want to revert to the previous version if you find any issues after upgrading.
Upgrading only Jenkins
On Linux and OSX you can execute the following steps to perform the above (notice that the installation directory is /opt/bitnami in the Bitnami virtual appliances and Bitnami Amazon Images):
 
$ cd
## Stop the server
$ ./ctlscript.sh stop
 
## Copy your previous .war file in case you need to restore it
$ cp apache-tomcat/webapps/jenkins.war apps/jenkins/jenkins.war.bak
 
## Remove jenkins all files to force Tomcat to deploy the new jenkins.war file
$ rm -r apache-tomcat/webapps/jenkins
$ rm -r apache-tomcat/webapps/jenkins.war
$ rm -r apache-tomcat/work/Catalina/localhost/jenkins
 
## Donwload the new version of jenkins
$ mv jenkins.war apache-tomcat/webapps/
 
## Start the server
$ ./ctlscript.sh start
On Windows you can stop the servers from the Start Menu entry or using the graphical tool that you can find in your installation directory. Using the file explorer go to where you installed the Bitnami Jenkins Stack. Copy the jenkins.war file from the apache-tomcat/webapps directory to apps/jenkins. Download the latest jenkins.war file and copy it in apache-tomcat/webapps. Now just start the server from the Start Menu or using the graphical tool.
Upgrading all the components
Alternatively to the process above, you can download a new Bitnami Jenkins Stack. You can install it to a different location (remember to stop the previous install so there are no port conflicts) and point it to your previous JENKINS_HOME path by editing the file  apache-tomcat/conf/Catalina/localhost/jenkins.xml.
If you are using a Bitnami virtual appliance or AMI you can start a new image with the latest jenkins version and move the content of /opt/bitnami/apps/jenkins/jenkins_home in your current installation to the new installation. Then restart the server.

How to enable SSL in Jenkins?

You can configure Apache Tomcat to enable SSL connections for accessing to the application using the HTTPS protocol. It is necessary to specify the Apache SSL certificate. If you do not have the cert you can create following these steps in the section below.
Check that you have the certificate file at "/installdir/apache-tomcat/conf/ssl/tomcat.cert.pem" and the certificate key file at "/installdir/apache-tomcat/conf/ssl/tomcat.key.pem".
To enable SSL you should uncomment the following line in the /installdir/apache-tomcat/conf/server.xml file:
8443
" protocol="HTTP/1.1" SSLEnabled="true" maxThreads="150" minSpareThreads="25" maxSpareThreads="75" enableLookups="false" disableUploadTimeout="true" acceptCount="100" scheme="https" secure="true" clientAuth="false" sslProtocol="TLS" keystoreFile="conf/myKeystore" keystorePass="your_password" SSLCertificateFile="installdir/apache-tomcat/conf/ssl/tomcat.cert.pem" SSLCertificateKeyFile="installdir/apache-tomcat/conf/ssl/tomcat.key.pem"/>
Then restart the Apache server and try to access at "https://localhost:8443".

How to create a SSL certificate for Jenkins?

You can find a detailed guide in the official Apache Tomcat documentation at http://tomcat.apache.org/tomcat-6.0-doc/ssl-howto.html

Friday, May 8, 2015

Generating SSH keys and Access to Github Repo from Machine

SSH keys are a way to identify trusted computers, without involving passwords. The steps below will walk you through generating an SSH key and then adding the public key to your GitHub Enterprise account.
Tip: We recommend that you regularly review your SSH keys list and revoke any that haven't been used in a while.

Step 1: Check for SSH keys

First, we need to check for existing SSH keys on your computer. Open up your Git Bash and type:
ls -al ~/.ssh
# Lists the files in your .ssh directory, if they exist
Check the directory listing to see if you already have a public SSH key. The default public key file names are:
  • id_dsa.pub
  • id_ecdsa.pub
  • id_ed25519.pub
  • id_rsa.pub

Step 2: Generate a new SSH key

To generate a new SSH key, copy and paste the text below, making sure to substitute in your email address. The default settings are preferred, so when you're prompted to "Enter a file in which to save the key", just press Enter to continue.
ssh-keygen -t rsa -C "your_email@example.com"
# Creates a new ssh key, using the provided email as a label
# Generating public/private rsa key pair.
# Enter file in which to save the key (/c/Users/you/.ssh/id_rsa): [Press enter]

Next, you'll be asked to enter a passphrase.
Tip: We strongly recommend a very good, secure passphrase. For more information, see Working with SSH key passphrases.
# Enter passphrase (empty for no passphrase): [Type a passphrase]
# Enter same passphrase again: [Type passphrase again]
Which should give you something like this:
# Your identification has been saved in /c/Users/you/.ssh/id_rsa.
# Your public key has been saved in /c/Users/you/.ssh/id_rsa.pub.
# The key fingerprint is:
# 01:0f:f4:3b:ca:85:d6:17:a1:7d:f0:68:9d:f0:a2:db your_email@example.com

Then add your new key to the ssh-agent:
# start the ssh-agent in the background
ssh-agent -s
# Agent pid 59566
ssh-add ~/.ssh/id_rsa

Step 3: Add your SSH key to your account

Run the following command to copy the key to your clipboard. Keep in mind that your key may also be named id_dsa.pub, id_ecdsa.pub or id_ed25519.pub.
clip < ~/.ssh/id_rsa.pub
# Copies the contents of the id_rsa.pub file to your clipboard
Alternatively, using your favorite text editor, you can open the public key file and copy the contents of the file manually.

Now that you have the key copied, it's time to add it to GitHub Enterprise:
  1. Settings icon in the user barIn the top right corner of any page, click .
  2. SSH keysIn the user settings sidebar, click SSH keys.
  3. SSH Key buttonClick Add SSH key.
  4. In the Title field, add a descriptive label for the new key. For example, if you're using a personal Mac, you might call this key "Personal MacBook Air".
  5. The key fieldPaste your key into the "Key" field.
  6. The Add key buttonClick Add key.
  7. Confirm the action by entering your GitHub Enterprise password.

Step 4: Test everything out

To make sure everything is working, you'll now try SSHing to your GitHub Enterprise instance. When you do this, you will be asked to authenticate this action using your password, which was the passphrase you created earlier.
Open up your Git Bash and type:
ssh -T git@hostname
# Attempts to ssh to GitHub Enterprise
You may see this warning:
# The authenticity of host 'hostname (207.97.227.239)' can't be established.
# RSA key fingerprint is 16:27:ac:a5:76:28:2d:36:63:1b:56:4d:eb:df:a6:48.
# Are you sure you want to continue connecting (yes/no)?
Don't worry! This is supposed to happen. Verify that the fingerprint in your terminal matches the one we've provided up above, and then type "yes."
# Hi username! You've successfully authenticated, but GitHub does not
# provide shell access.
If that username is yours, you've successfully set up your SSH key! Don't worry about the "shell access" thing, you don't want that anyway.
If you receive a message about "access denied," you can read these instructions for diagnosing the issue.
If you're switching from HTTPS to SSH, you'll now need to update your remote repository URLs. For more information, see Changing a remote's URL.

My Profile

My photo
can be reached at 09916017317