

Most caching bugs don't come from Redis or Memcached.
They come from bad judgment, caching the wrong thing, caching too soon, or caching without a clear reason.
You added Redis. Slapped a .get() around a slow query. Threw in a .set() after it. The app got faster.
So you did it again. And again. Until cache wrapped everything.
Now you've got problems no profiler will catch:
Users see outdated prices
Debugging is a coin toss. Was that from the DB or cache?
Your memory footprint tripled, and eviction is eating the wrong keys
No one knows which keys still matter, or if they ever did
This is what happens when caching becomes a reflex instead of a decision.
It's not that caching doesn't work. It's that most engineers cache before they think.
Caching decisions shouldn't be ad hoc. To avoid that, start here:
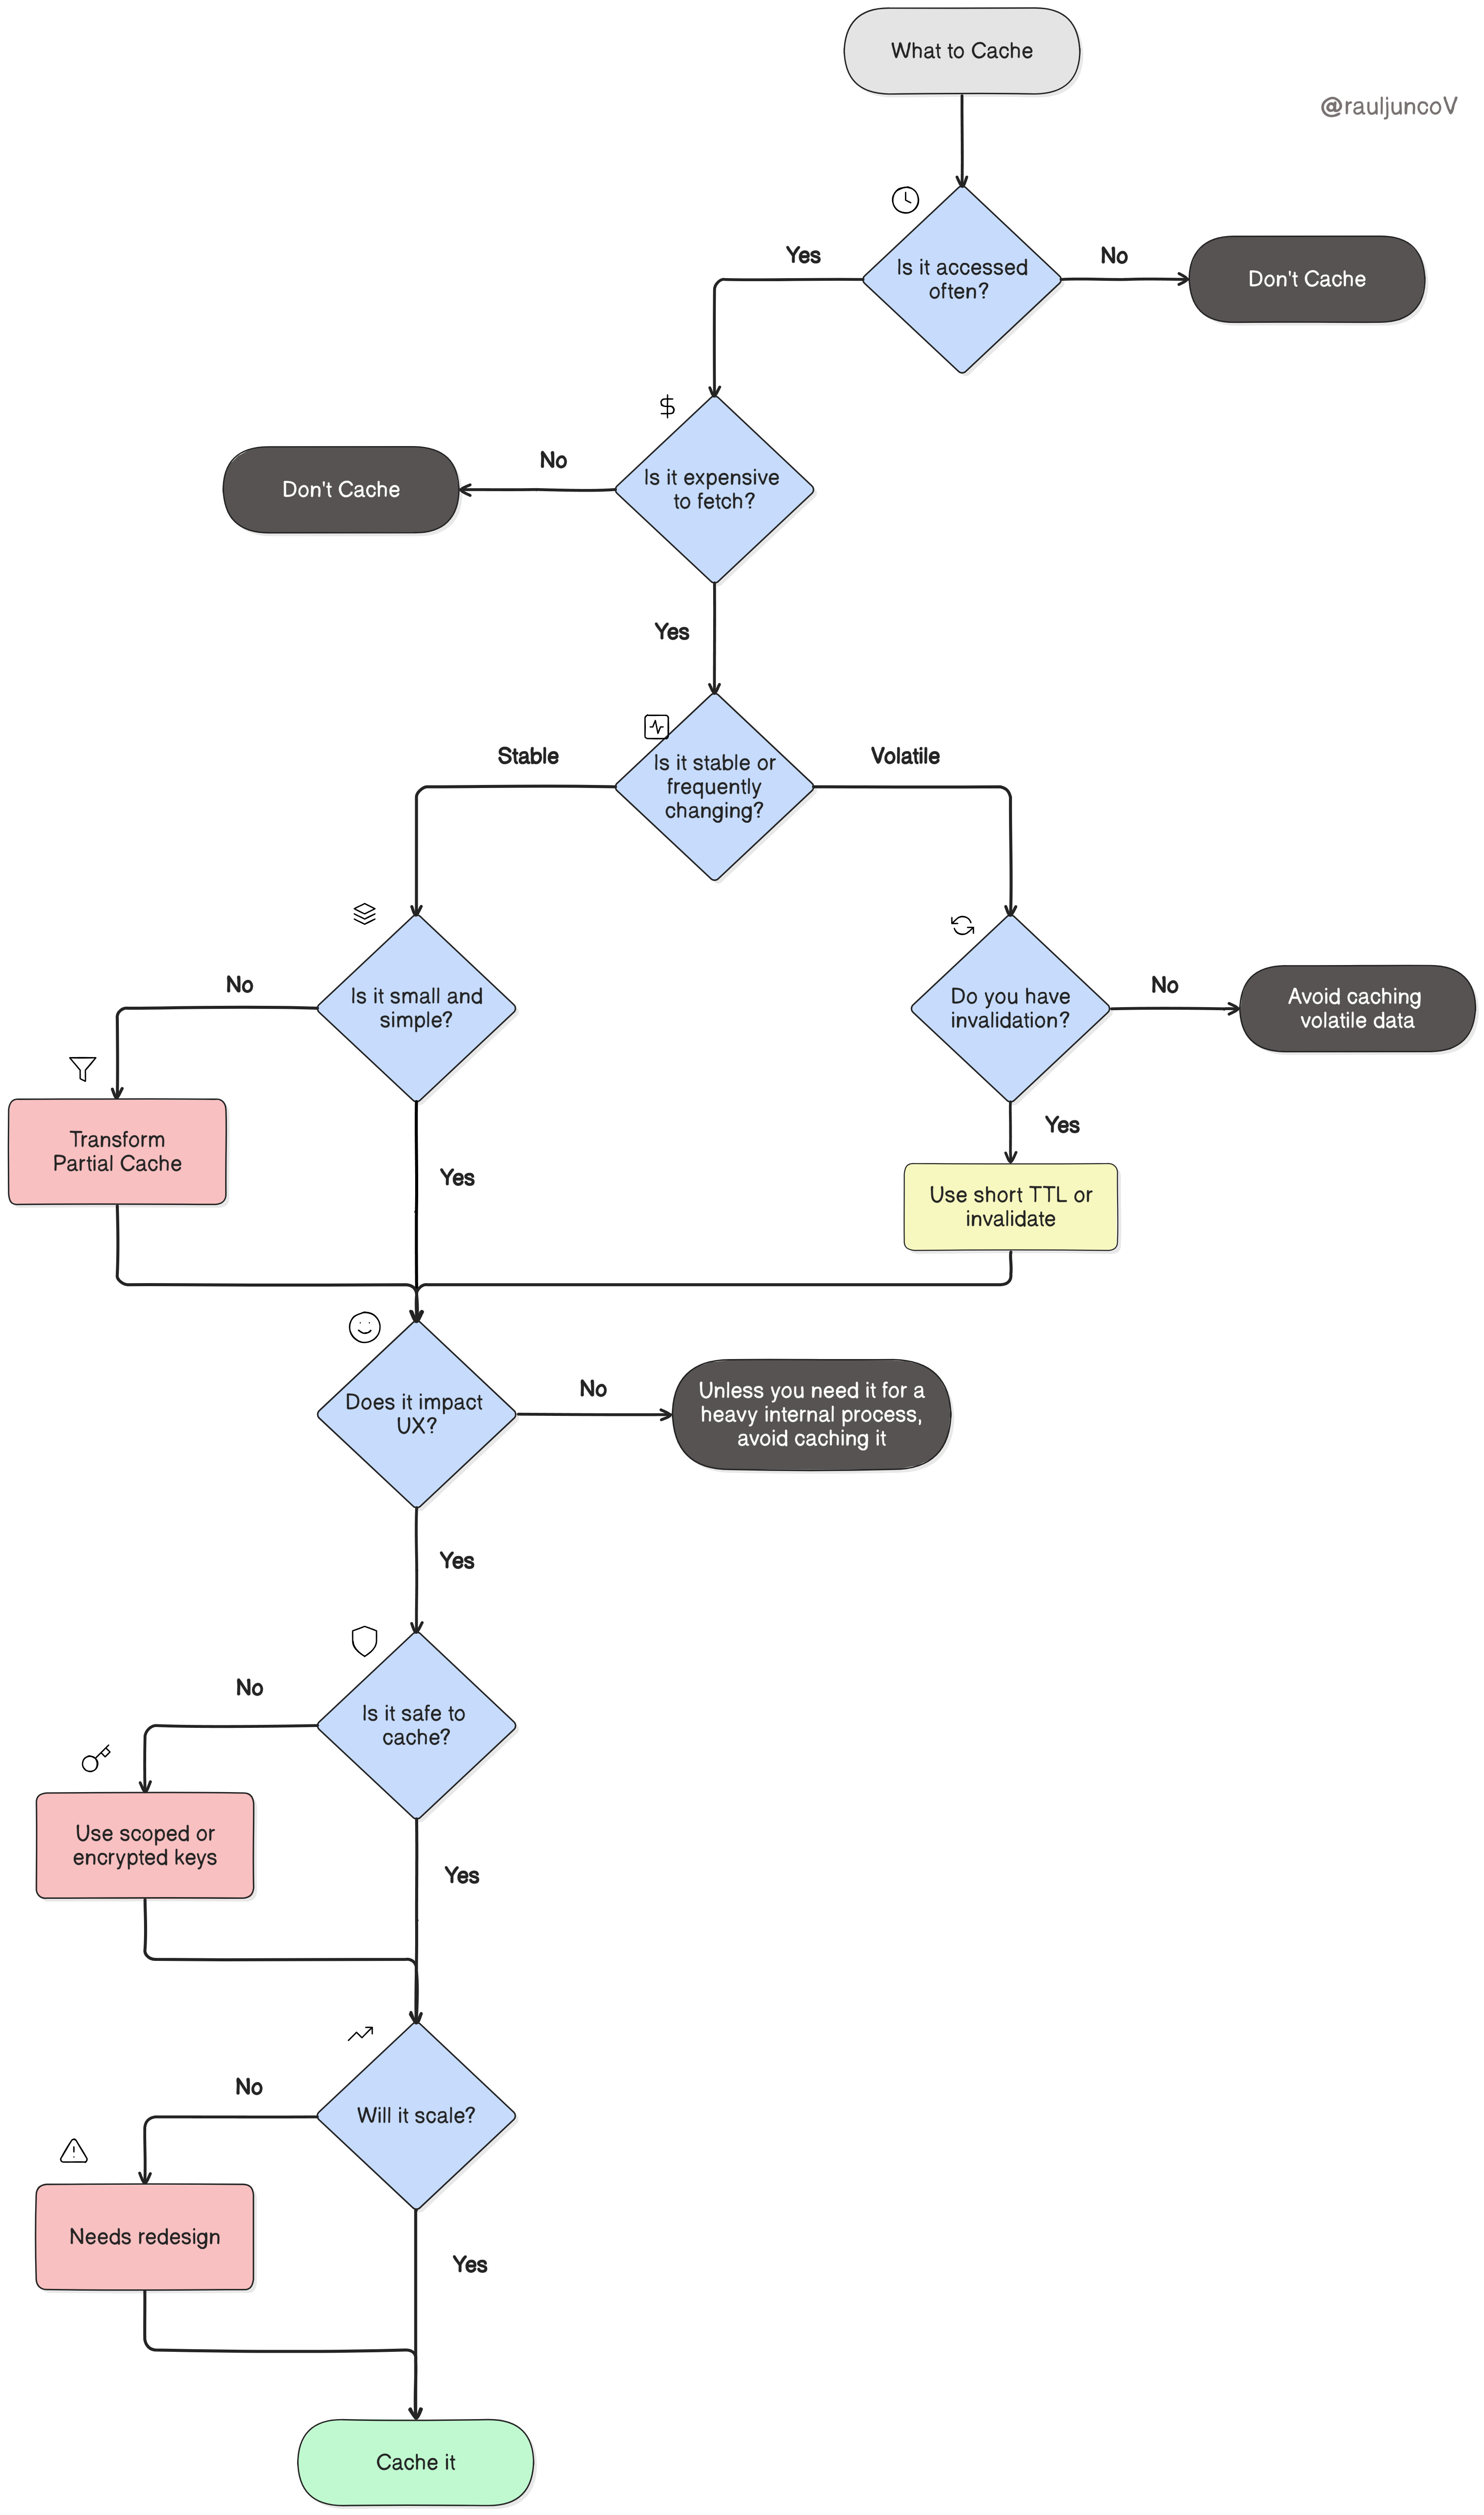
Now let's break it down, question by question.
1. Is the data accessed frequently?
If a piece of data is rarely used, caching it doesn't help, it just takes up space.
But if it's hit constantly, by the same user or across many users, then caching saves real work.
Example:
Caching the homepage's product recommendations makes sense; they're requested thousands of times an hour.
But a one-time CSV export from an internal dashboard? That'll never be read again. Let it hit the database.
You don't batch-cook a meal no one orders. Cache is like a prep kitchen; only prep what is popular.
Simply put: the more traffic a key absorbs, the more return you get per byte of cache.
2. Is it expensive to retrieve?
Not all reads are equal. Some come cheap. Others hit external services ($$$), three databases, join ten tables, and compute summaries that cost real CPU.
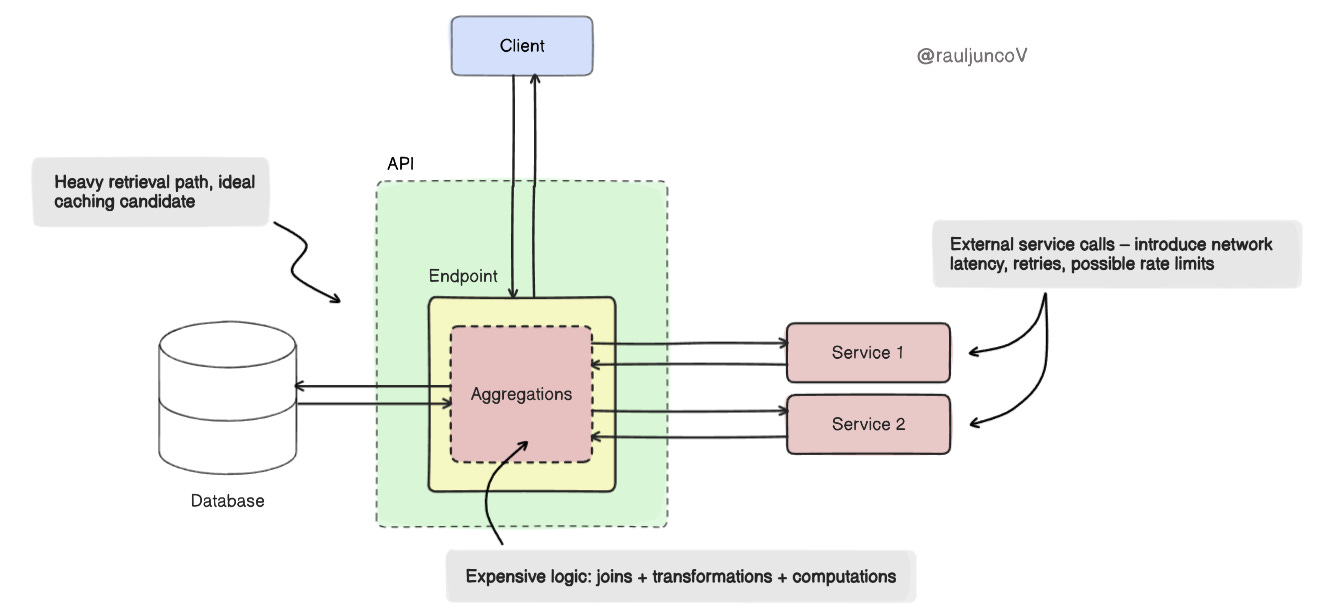
That's where caching makes a difference.
Example:
Generating a user's analytics dashboard might involve multiple service calls and heavy aggregation. Cache the final payload.
But fetching a flat record by primary key from a well-indexed table? It's already fast. Skip the cache.
Cache is a shortcut. Use it where the path is long.
3. Is the data stable or volatile?
Stable data makes a great cache. It can sit there for minutes, even hours, without anyone noticing.
Volatile data? Not so much. If it's stale, it's wrong, and now you're in trouble.
Example:
The list of supported countries won't change mid-session. Cache it for days.
But stock levels on a flash-sale item? That can change every second. Caching it without real-time invalidation will cost you trust and money.
If you cache volatile data, you either need:
A short TTL (Time-To-Live)
Or an explicit invalidation hook (e.g., when the DB updates)
If you can't tolerate being a little wrong, don't cache it at all; or cache it with a plan.
Once you've decided to cache something, the next question is:
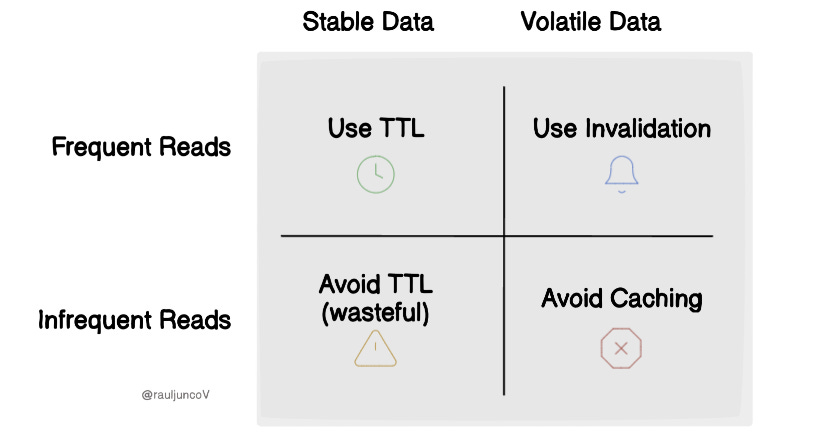
How do you keep it fresh?
You have two main tools:
TTL (Time-To-Live): Set it and forget it. Let the data expire after a fixed time.
Invalidation: Explicitly remove or update the cache when the data changes.
Each has trade-offs. Use the wrong one, and you'll either serve stale data or waste cache space.
Here's a simple matrix to help you choose the right approach based on how the data behaves:
4. Is the data small and simple?
How big is this data object? Is it cheap to serialize and deserialize?
Big, messy data doesn't belong in fast memory.
Large payloads eat up space, increase GC pressure, and slow down serialization and deserialization.
Small, flat data is faster to work with and easier to evict if needed.
Example:
A compact JSON with 10 fields → good candidate
A massive blob with 1,000 nested items → probably not
A classic antipattern is caching the entire product catalog (100K items) instead of caching paginated views or product summaries.
Cache is a fast-access shelf, not cold storage. Store what fits and what you'll grab often.
Small keys, simple shapes. That's how cache stays fast.
5. Does it directly impact user experience?
Not all latency matters. But when it does, it matters a lot.
Anything on the critical path of a user interaction, loading a page, rendering a component, or hitting “submit” should feel instant.
If caching makes that possible, use it there.
Example:
The response time for a search query or product page load directly affects conversion.
But a background sync task running at 2AM? No one's waiting on it.
Cache where speed is felt, not just where it's measured.
6. Is it safe to cache?
Fast is good. Leaky is not.
Caching user-specific or sensitive data, PII, tokens, and financials without scoping or encryption is a security risk. One bad key and someone sees what they shouldn't.
Examples:
A shared cache key for user:profile might accidentally leak another user's data in a multi-tenant app.
Always scope keys and apply access control if needed.
Mitigations:
Use per-user or per-session cache keys
Encrypt values when possible
Set short TTLs for sensitive data
A rule of thumb: If it can't go in a log file, it doesn't belong in a shared cache.
7. Will this scale?
Caching that works for 1,000 users can collapse at 1 million.
Unbounded keys, high churn, or poorly managed TTLs can overwhelm memory, reduce hit ratios, and cause eviction storms.
Example:
A per-search query cache key (search?q=...) sounds harmless—until it creates millions of one-time keys.
Normalize input. Bound cardinality. Use sensible TTLs.
Tactics:
Use eviction policies (LRU, LFU)
Set size limits
Monitor hit/miss ratio and eviction churn
Don't keep every conversation in memory, just the most recent ones.
These questions work well when you can reason through them case by case.
But if you want a quick gut-check, here's a mental model to remember:

If any of these are near zero, caching that data won't give you much back.
If all three are high, you're sitting on a high-leverage cache opportunity.
Final Takeaways
Caching works best when it's boring, predictable, scoped, and justified.
Not clever. Not magical. Just correct.
Here's what separates high-leverage caching from tech debt in disguise:
Cache what's used frequently
Cache what's expensive to fetch
Cache what stays valid long enough to be worth it
Cache what improves something a user can actually feel
And never cache what you can't safely explain or scale
Every cached key is a liability until it proves its value.
Design each one with the same intent you'd give a database schema or API contract.
If you can't answer why something is in the cache, it probably shouldn't be.
In high-performing systems, caching isn't an afterthought.
It's a deliberate, visible part of the architecture, with trade-offs, constraints, and clear justification.
Smart systems don't cache more.
They cache better.
